Friday, May 11, 2012

Upcycled Jeans Into a Skirt


Upcycled Jeans Into a Skirt


This skirt was made from an old pair of jeans. I work at an alteration shop here in my hometown. I try to keep and use the scraps I have left over from the jobs. This particular job was just a simple patch on another pair of jeans so the client gave me the extra pair to use for the patch and said I could trash the rest. TRASH THE REST? Yeah right!
I have made a step-by-step process with pictures. 
When I search the web for tutorials, I like the ones with lots of pictures. So that’s how I’m doing mine. More pictures and less talking. I hope this helps anyone who reads these instructions.

You’ll need:
1. old pair of jeans
2. scissors
3. elastic
4. safety pin
5. sewing machine
6. strait pins (optional)

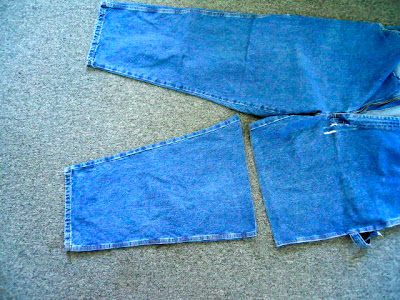
Cut the legs the desired length of the skirt plus seam allowance.
  

Lay them out side by side and cut them open on the seam. DO NOT cut on the overstitch/safety stitch seam. That will be the middle of the front and back of the skirt.

I’ve seen a similar project done with bell-bottoms. But you don’t need to have bell-bottoms. You can use any pair. Just use the cuff of the pants as the waist the wider part of the pants as the hem.

Now line up the middle seams

Round the wider part for the hem. You might need to cut off the original cuff hem and sew your own waist band if your machine has problems sewing on heavy duty fabric. 

Then cut the sides so that they line up together and are even with the middle seam. 

You might need to cut off more on one side then the other.

Depending on the size of the person, you might need to cut off a little more at the waist. Just taper your cut.

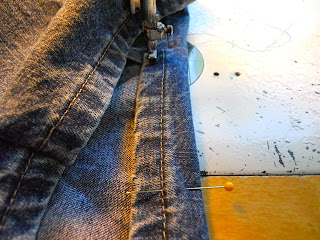
Face right sides together and sew up the sides

Sew up the hem

Sew up your waist making sure you leave room to run the elastic through but leave an opening for your elastic.

Measure your elastic on your subject and hook a safety pin at the end. Guide it through the waist part making sure the other end does not disappear.  Once it is pulled through, sew them together and finish sewing up your elastic opening.
          

 The skirt is done! Up you can use remaining fabric to sewing on appliqué pictures OR you can cut out the back pocket and sew that on. Let your imagination take you away!!!
Happy Sewing!!!


Friday, December 30, 2011

Upcycling


I love to upcycle (the process of converting waste materials or useless products into new materials or products of better quality or a higher environmental value.) It has got to be one of my most favorite things to do, if not thee most favorite! 

Im a sewer so most of my upcycling is done with knits.

This scarf has a touch of vintage jewelry on it. 

 Sweaters are the most common items I use.  I've been meaning to open an Etsy shop, but seem to never get around to it. I will soon though. lol

 I hope to post some tutorials soon on this blog.

I found a sweater one day while searching the racks at the Good Will. It was covered in perl beads. So I have been having fun using it to decorate some of my scarves. 


This dress is made from a woman's top. I've even made a headband to match. 


Thursday, May 26, 2011

Upcycled Diva Headbands!!! You can make.

I've been wanting to try this for a long time and finally got around to doing it. I must say, they came out more better then what I thought. And now I want to share how to make them with everyone! This is my first tutorial ever!  Lets get started, shall we?

You will need:
E-6000 glue or hot glue
Bling bling dress with all kinds of sequins
felt to match dress (in this case, black)
headband stretchy or the one that goes half way around the head
a pair of scissors (preferably fine ones)

This is the dress I used. I love the sequins on this one. It was perfect for this project.

You will need to cut around the designs and careful that you don't cut the thread holding the sequins together. That is why I prefer to use fine scissors because it is easier not to cut the thread. If you happen to cut through the thread,  before it comes loose, glue the thread down on the back. That will help it from coming unraveled.

Next, you want to glue the embellishment onto the felt. Arrange them how you like.


Once the the glue dries, you will cut around the sequins.

Then last but not least, glue the it all to the headband and seal it with another pice of felt over it (not shown in picture).


The stretch one can be worn the regular way or hippie style. If you think it fits a little snug, no need to worry, you can always cut the band before you glue it onto the sequins.

Hope you enjoyed this tutorial and attempt to make one yourself.  Thank your for looking. Please leave comments I would love to hear your thoughts.

Thursday, April 28, 2011

Listia Finds


 OMG! I am soooooo addicted to Lista.com.  This is a website where people bid with points or what they call credits.  The person who bids the highest looses. NO JUST KIDDING. You know the deal. The winner is the winner because they had the highest bid.  I have been making handmade items and giving them away on Lista. You can choose to charge shipping or send them for free, your choice. I will say that, you get WAY more credits for your item if you pay the shipping yourself.  The key is to auction off small items that don’t weigh much. I have made crafting supplies like fabric flowers and Yo-Yos. I make a lot of hair accessories too.  Jewelry is very popular on there. I have so much fun crafting and getting something in return.


I have won a few items myself.  My latest item was a toy phone from the 1930’s or so.  It is something I have been wanting for a long time.  I like this one very much.  I think this is going to be one of my collections. I’m fascinated with them.  How many owners? Who were they and are they still alive today? So many memories this toy would have if it could think.


I also won a wonderful lot of old smoking pipes. One was a very nice Butz Choquin.  These pipes I sold on my Etsy shop and one on Ebay.

I just won a Bath and Body Works cranberry set and a strawberry body spray yesterday. Yummy! I can’t wait to indulge myself. If you would like to give this cool Listia a try, then just click on the link here on my blog and sign up.  They give you a few hundred credits to start with. But watch out because it can become VERY addicting. Oh, and did I mention that it is all free. Yes, it cost you nothing to join and list items. 
Every auction has a place where bidders can leave comments about your auction. And a place where you can reply to them.  If you don't like a comment you can delete it and block that person all together if you wish. Then they can comment or bid on your auctions. Cool, huh? 
And check this out, they have raffles where you can buy tickets with your credits to enter.  One credit equals one ticket. Im in a drawing for an Ipad 2nd Gen. I never win but it won't hurt me none to try.  Well enough about it, you just have to check it out.  Hope I didn't bore anyone.